Posts

Showing posts from July, 2017

Skype for Business Online cmdlets

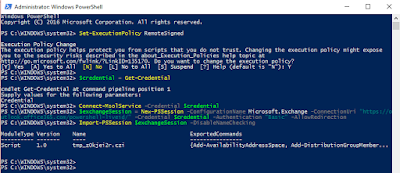
Sometime its easier know where we copied our important cmdlets to. Technet: https://technet.microsoft.com/en-us/library/mt228132.aspx Broadcast cmdlets Get-CsBroadcastMeetingConfiguration Set-CsBroadcastMeetingConfiguration Get-CsBroadcastMeetingPolicy Grant-CsBroadcastMeetingPolicy Calling Line cmdlets Get-CsCallingLineIdentity Grant-CsCallingLineIdentity New-CsCallingLineIdentity Remove-CsCallingLineIdentity Set-CsCallingLineIdentity Call Queue cmdlets Get-CsHuntGroup New-CsHuntGroup Remove-CsHuntGroup Set-CsHuntGroup Client Policy cmdlets Get-CsClientPolicy Grant-CsClientPolicy New-CsClientPolicy Remove-CsClientPolicy Set-CsClientPolicy Cloud Meeting cmdlets Get-CsCloudMeetingConfiguration New-CsCloudMeetingConfiguration Remove-CsCloudMeetingConfiguration Set-CsCloudMeetingConfiguration Get-CsCloudMeetingPolicy Grant-CsCloudMeetingPolicy New-CsCloudMeetingPolicy Remove-CsCloudMeeti

Office 365 Groups change Primary SMTP Address

Image
Several settings can only be changed via PowerShell. One of this in Office 365 Unified Groups is the SMTP Primary Address. First you run PowerShell in Admin Mode and login to Exchange Online: Set-ExecutionPolicy RemoteSigned $credential = Get-Credential Connect-MsolService -Credential $credential loading the Exchange Online Module: $exchangeSession = New-PSSession -ConfigurationName Microsoft.Exchange -ConnectionUri " https://outlook.office365.com/powershell-liveid/ " -Credential $credential -Authentication "Basic" -AllowRedirection Import-PSSession $exchangeSession -DisableNameChecking Next listing all your Office 365 Unified Groups: Get-UnifiedGroup | fl name,alias,*smtp* Once you identified the group, you change the SMTP: Set-UnifiedGroup -Identity sfbusergroup-cologne -PrimarySmtpAddress sfbusergroup-nrw@skype4b-ug.de Further more, you can change the all other attributes. https://technet.microsoft.com/library/mt238274(v=e

Outbound Call ID Overwrite with Call Queues (CallingLineIdentity)

Configuring User Outbound Call ID Overwrite As usual, the way how you can modify more parameter is strictly by using PowerShell. I need stepping into one PowerShell scripting to present the outbound calling ID overwrite . For example, if a Call Queue represents a Support Team, you want that each dedicated person in this team to not expose their DID. You need to configure a Distribution Group for those team members used in the Call Queue. Next step is creating a “ Calling Line Identity ” policy, where you enable the User Overwrite. The Service Number you are defining should be this you have assigned to the Call Queue! The Calling ID Substitute should be the name of the team. New-CsCallingLineIdentity -Identity "SupportTeam01" -CallingIdSubstitute " Support Team Office 365 " -ServiceNumber  498912345678  - EnableUserOverride $True – Verbose Note : The key here is not to use “+” before the Service Number assigned to AA or call Queue to make it work

Enable Exchange Online for modern authentication for Focused Inbox Outlook 2016

Image
Modern Authentication is required for Focused Inbox in Outlook 2016. Outlook 2016 must be installed via Click-2-Run The focused inbox in Outlook 2016 look like this: and in OWA: Microsoft Online Login Set-ExecutionPolicy RemoteSigned $credential = Get-Credential Connect-MsolService -Credential $credential Login to Exchange $exchangeSession = New-PSSession -ConfigurationName Microsoft.Exchange -ConnectionUri " https://outlook.office365.com/powershell-liveid/ " -Credential $credential -Authentication "Basic" -AllowRedirection Import-PSSession $exchangeSession -DisableNameChecking Enable Modern Authentication in Exchange Online Set-OrganizationConfig -OAuth2ClientProfileEnabled $true Get-OrganizationConfig | Format-Table -Auto Name,OAuth* Author: Thomas Poett MVP, Business Unit Lead Microsoft Unified Communication 

Cloud Connector Edition 2.0 - What's new?

Hi all, i have listed the updates and improvements made with Cloud connector Edition Version 2.0 The both first improvements are the most interesting ones. The CCE installation now supports more Cloud PBX User and a much higher call volume. With a support of 500 concurrent SIP Call per CCE, it was in the past possible to run with 4x CCE 1.500 simultaneous calls, while 1 CCE was reserved for High Availability. The ratio of 1:10 meaning, we had support for up to 15.000 Cloud PBX User pre CCE Site. Now with the improvement for up to 16 Node: we can have up to 7.500 simultaneous calls , this is Large Enterprise ready! we support up too 75.000 Cloud PBX Users per CCE Site . More details and configuration information you will finde here: http://www.uclabs.blog/2017/05/media-bypass-with-cloud-connector-editon.html Lets have a look into all important feature added: Media Bypass Support of 16 Cloud Connector Editions per one PSTN Site Ability to manipulate SIP he

Get your Azure Tenant ID

Image
The tenant ID is tied to ActiveDirectoy in Azure Navigate to Dashboard Navigate to ActiveDirectory Navigate to Manage / Properties Copy the "Directory ID" Profit

Skype for Business from within Yammer

Image
Excellent news: You can start now using Skype for Business within Yammer: New need to have an Office 365 Tenant, where Skype for Business is enable... https://support.office.com/en-us/article/Use-Skype-for-Business-from-within-Yammer-e221b8ae-9647-4b46-b79e-257c36b1a1f8?ui=en-US&rs=en-US&ad=US Login to Yammer: Next you can start your conversation (IM) Note: I haven't seen A/V yet, but IM is a more necessary feature (Pictures taken from office support)